Embarking on your journey to e-commerce success has never been more accessible with Shopify, one of the leading e-commerce platforms globally. Opening a Shopify store is a relatively straightforward task, but it still requires strategic planning and thoughtful execution.
It’s not just about creating an online space to display your products; it’s about building a virtual storefront that speaks to your brand, resonates with your target audience, and fosters customer loyalty.
With a blend of the right strategies, resources, and a touch of entrepreneurial spirit, you can launch a Shopify store that truly stands out in the competitive digital marketplace. Let’s get started.
13 Steps to Open a Shopify Store
Creating an online Shopify store is an easy task. To guide you through the process, we’ve outlined 12 essential steps to help you set up a successful Shopify store from scratch.
- Step 1: Choose a store name,
- Step 2: Create an account,
- Step 3: Explore the dashboard,
- Step 4: Manage orders,
- Step 5: Add products,
- Step 6: Organize customers,
- Step 7: Add content
- Step 8: Explore analytics,
- Step 9: Think of a marketing campaign,
- Step 10: Create discounts,
- Step 11: Add apps and plugins,
- Step 12: Personalize your store,
- Step 13: Set up the back end.
Step 1: Choose a Store Name
Choosing a store name is the very first step in setting up your Shopify store, and it carries a significant weight. The name of your store is not just an identifier, it’s the initial touchpoint that introduces your brand to potential customers. Here’s how to approach it:
- Make it unique and memorable. The name should be unique to your business and catchy enough for customers to remember. Avoid using generic or common words. Instead, choose a name that reflects your Shopify brand’s personality and the products you’re selling.
- Ensure it’s easy to pronounce and spell. Keep in mind that word-of-mouth is still a powerful marketing tool. If your store name is easy to pronounce and spell, customers will have an easier time sharing it with others.
- Check for domain availability. Once you have a name in mind, you’ll need to check if the corresponding domain name is available. Your store’s URL should ideally match its name.
- Legal considerations. Make sure the name you’ve chosen isn’t trademarked or in use by another company. You can do a quick search on the internet and through the trademark database of your country.
- Use our Shopify Name Generator. Using our name generator will ensure that you buy the right domain name. You have hundreds of options to choose from in just a few simple steps. And the names are all unique too.
Step 2: Create an account

Once you’ve made the decision to choose Shopify as your ecommerce platform, you can sign up for a free 3-day trial and create your account.
During this trial period, you can test out various features of Shopify without any charges. This includes setting up your online store, adding products, and configuring payment and shipping settings. You can also explore different Shopify themes and apps to customize your store.
This trial period is crucial because it helps you understand how Shopify works and whether it aligns with your business needs. You can make an informed decision about whether to proceed with a paid subscription or not once the trial ends.
Remember, during the trial period, you can set up your store and make it ready for sales but actual selling or accepting orders is not possible until you choose a paid plan. By the end of the 3-day trial, if you’re satisfied with the platform’s capabilities, you can seamlessly transition into a paid plan and officially launch your online store.
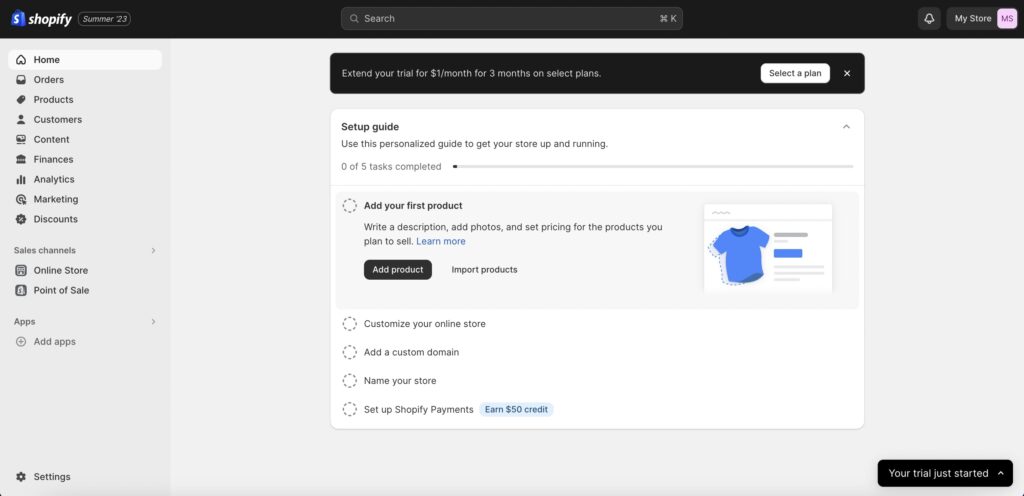
Step 3: Explore the Dashboard
Once you’ve set up your account, spend some time familiarizing yourself with the Shopify dashboard. This is where you’ll manage everything from products to orders, customer data, analytics, and more. It’s user-friendly, but understanding all the features will make your operations smoother.
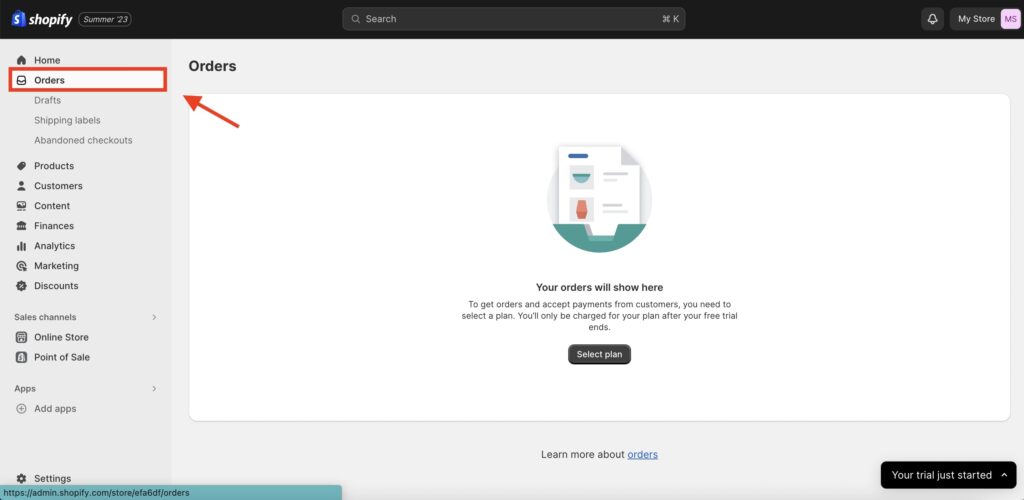
Step 4: Manage Orders
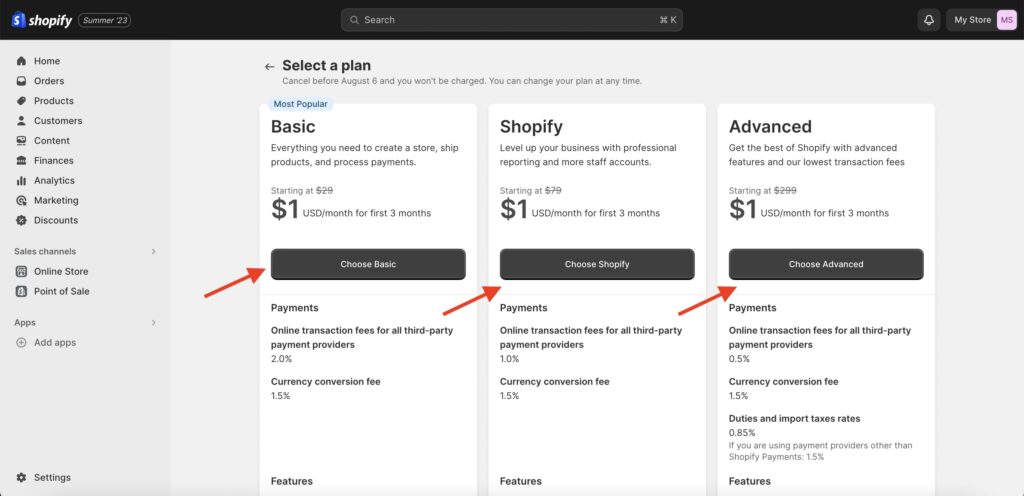
The ‘Orders’ section of the dashboard is where you’ll handle order processing, refunds, and customer communications. Understanding this area will help you maintain customer satisfaction through timely and efficient order management. You first have to select a plan out of the five Shopify plans available: Basic, Shopify and Advanced. You will be charged as soon as your trial period ends.
Shopify fees for each plan are as follows:
- Starter: $5 per month
- Basic: $29 per month for a yearly plan
- Shopify: $79 per month for a yearly plan
- Advanced: $299 per month for a yearly plan.
- Plus: Starting from $2000 per month.
MORE: How Much Does Shopify Cost?
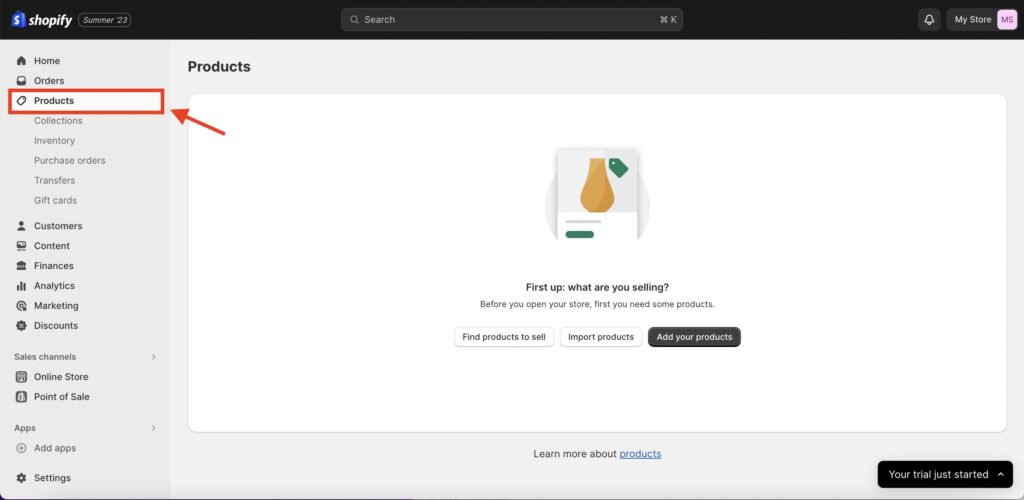
Step 5: Add Products
Your online store needs inventory. You can add products manually, or import them from a CSV file. Make sure to include quality images, compelling descriptions, and accurate pricing.
Step 6: Organize Customers
Use the ‘Customers’ section to understand and manage your customer database. Shopify stores customer information from orders, which can be used for email marketing, personalization, and customer service.

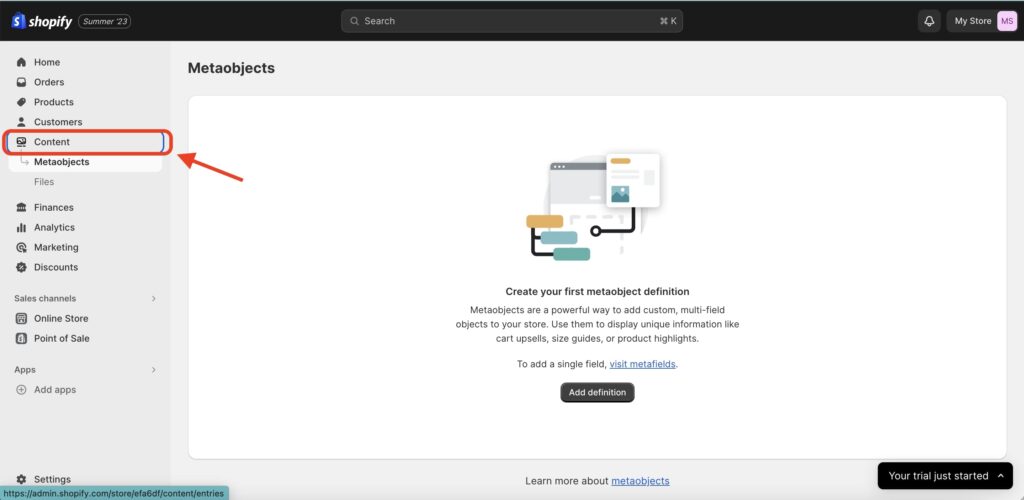
Step 7: Add Content
Add metaobject definition and files. Metaobjects offer an effective method for introducing customized, multi-field entities to your online store. They can be utilized to showcase distinctive data such as recommendations for cart upsells, size guides, or noteworthy product features.
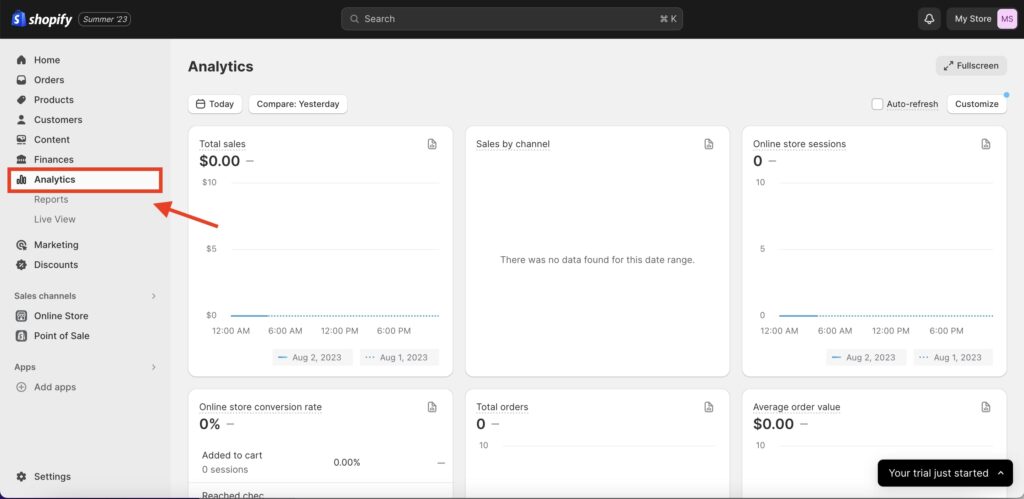
Step 8: Explore Analytics
Shopify provides analytics tools to track your sales, customer behavior, and other essential data. Use this information to make informed decisions about product offerings, marketing strategies, and store improvements.
MORE: How does Shopify reporting work?
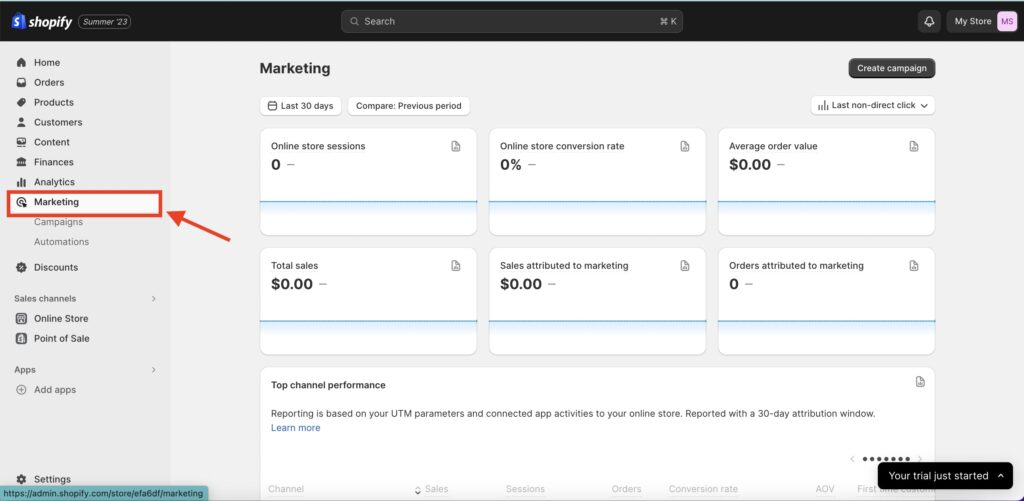
Step 9: Think of a Marketing Campaign
Your products won’t sell themselves. Utilize SEO, social media, email marketing, and advertising to attract and convert visitors. You might start with promotional campaigns, content marketing, or influencer partnerships. Remember that an attractive marketing campaign starts with an attractive business name. If you’re still stuck for ideas, we recommend checking out our Business Name Generator that generates hundreds of attractive business names.
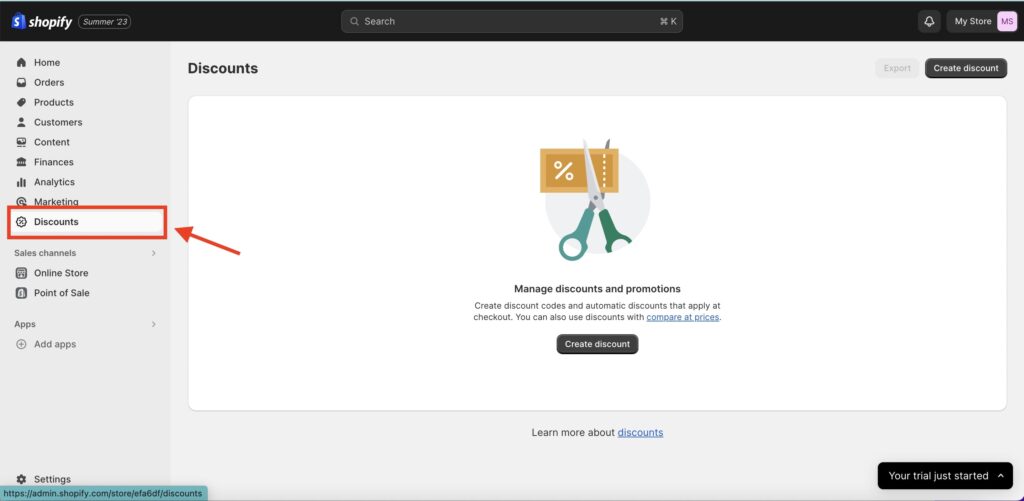
Step 10: Create Discounts
Discounts can be a powerful tool to drive sales. You can create discount codes, set sales prices for products, or offer free shipping. Be strategic with discounts to increase conversion rates without hurting profit margins.
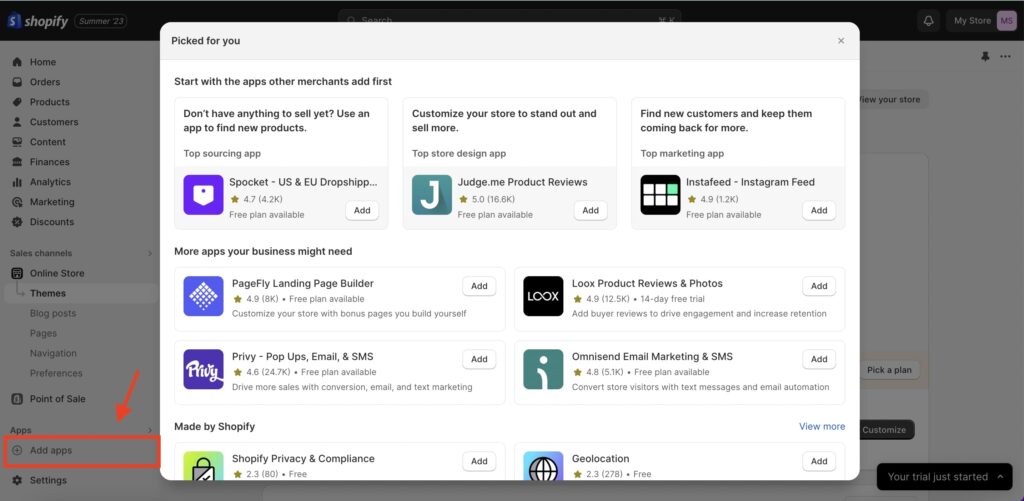
Step 11: Add Apps and Plugins
Shopify’s App Store offers thousands of add-ons to enhance your store. From improving SEO, managing inventory, creating email marketing campaigns, to enhancing customer service, there’s an app for almost every need.
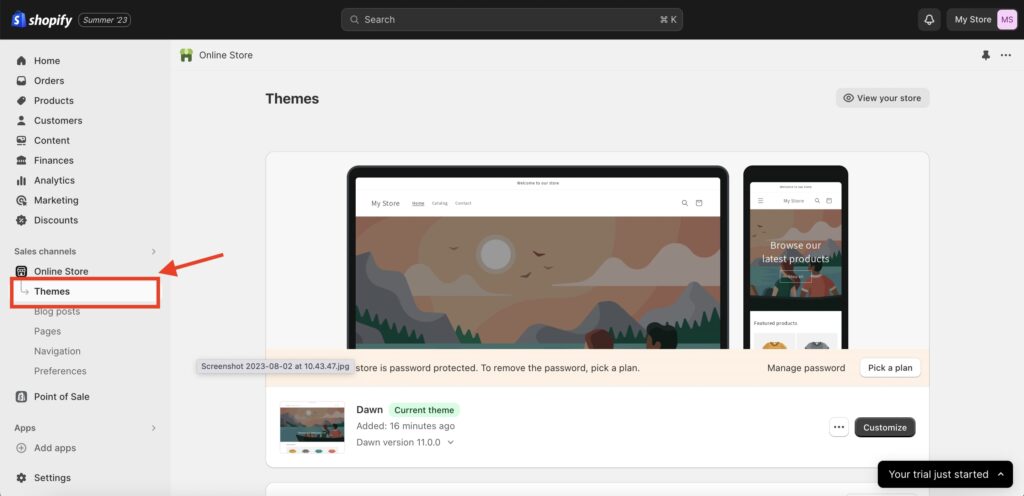
Step 12: Personalize Your Store
Choose a theme. Shopify has its official theme store. These themes are all guaranteed to have full support from the designers, so you know that your store is in good hands. Customize your theme, create a logo and watch your Shopify Store come to life.
MORE: How to change a Shopify shop name
Step 13: Set Up the Back End
The back end of your Shopify store includes settings for payment gateways, shipping, taxes, and notifications. Make sure these are properly set up to ensure smooth operations and compliance with e-commerce regulations.
Fine Tune Shopify Settings
Bonus steps to opening your Shopify store:
Setting up a payment processor
It involves integrating a system that allows your store to accept and process payments from customers. Shopify provides a built-in payment gateway, Shopify Payments, which is easy to set up and accepts major credit cards. However, you can also choose from over 100 third-party payment gateways such as PayPal, Stripe, or Apple Pay.
This process generally involves creating an account with the payment provider, setting up your bank information for deposits, and then linking this account with your Shopify store. This step is crucial because it ensures that you can smoothly and securely receive funds from your customers when they make purchases.
Choose a domain name
Choosing a domain name involves selecting a unique URL that customers will use to visit your online store. This domain name should ideally reflect your brand and be easy to remember for your potential customers. Shopify allows you to buy a domain directly from its platform, or you can purchase one from other domain registrars such as GoDaddy and then connect it to your Shopify store.
Once you have a domain name, you’ll need to set it up in Shopify’s settings so that it directs visitors to your online store. Remember, your domain name is essentially the address of your online shop, so it’s crucial that it is representative of your brand, easy to spell, and memorable.
Checkout
Customize your checkout settings to streamline the process for your customers. You can enable guest checkouts, require customers to agree to your terms and conditions before purchasing, and customize the order processing settings to match your fulfillment process.
Set Up Taxes
Ensure your tax settings are correct based on your store’s location and where you’re selling and shipping your products. If you’re in the US, EU, Canada, or other regions with complex tax laws, you might want to use automatic tax calculations.
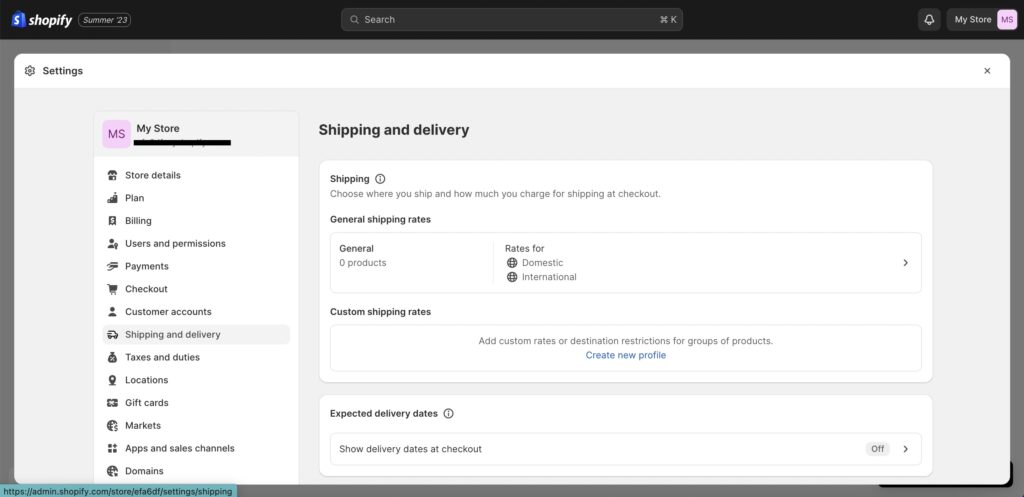
Shipping
Define your shipping zones, rates, and methods. If you’re shipping physical goods, it’s crucial to set this up correctly. You can offer free shipping, flat rate shipping, or rates based on product weight or price.
Customize your email notification settings to keep your customers informed about their orders. You can customize the emails that get sent out when orders are placed, shipped, or canceled.
Video Guide to Avoid Common Shopify Opening Pitfalls
Learn more how to avoid 5 common pitfalls when opening a Shopify store in this video.
Pros and Cons of Opening a Store
Still uncertain about opening a Shopify Store? In the following section, we’ll dissect the various pros and cons of opening a Shopify store. This balanced view can provide valuable insights to ensure that Shopify aligns with your unique business goals and needs.
| Pros | Cons |
|---|---|
| User-friendly interface | Fees for transactions, premium themes, and apps can add up. |
| Wide range of features | Advanced customization requires knowledge of Shopify’s own coding language, Liquid. |
| Large selection of customizable themes. | Blogging and content creation capabilities are limited compared to dedicated CMS platforms. |
| Excellent customer support — 24/7 assistance via phone, email, and live chat. | Moving your store from Shopify to another platform can be complex. |
| SEO and marketing tools. Built-in features to drive traffic and increase conversions. | Managing a high number of SKUs can become complicated. |
| Suitable for businesses of all sizes. | Shopify’s URL structure isn’t as SEO-friendly as it could be. |
| App integrations — vast marketplace of apps to extend your store’s functionality. |
MORE: How to Start an Online Business
Takeaway Points
Starting a Shopify store involves understanding your product and target audience, followed by selecting the right plan that suits your business needs. Prioritize customization to ensure your store’s aesthetics resonate with your brand and audience. The importance of adding detailed product listings with high-quality images, setting up multiple payment options, and optimizing your store’s SEO cannot be overstated.
Once launched, effective marketing strategies are necessary to drive traffic and retain customers. Lastly, continuously monitor your store’s performance and adapt to changes to ensure growth and sustainability.
If you are just starting out setting up a Shopify store, then use our Shopify Business Name Generator tool to help you come up with the perfect store name.